

Receive our product catalogue free of charge!
Please click the button to order our free product catalogue.
The Rollator Walker 9er is your perfect rollator to use both indoors and outdoors. With its 9” wheels and extra-soft PU-tires you’ll enjoy high comfort and a well-balanced performance. The Walker 12er is your faithful companion when you are heading outdoors. Its 12” wheels and air-filled tires guarantee a very comfortable ride, and it’s perfect for every urban and outdoor area. The Trionic Walker 14er is the world’s first rollator with 14” big wheels. All the new Trionic Walker rollators are equipped with a synchronized steering feature that eliminates the problems with shimmying and skewed swivel wheels.
The Walkers are tested and approved according to the international standard ISO-11199-2:2005, for a maximum user weight of 150 kg.
| Walker 9er M | Walker 12er S | Walker 12er M/L | Walker 14er M/L | |
|---|---|---|---|---|
| Min. height: | 74 cm | 71 cm | 76 cm | 81 cm |
| Max. height: | 94 cm | 86 cm | 96 cm | 100 cm |
| Width: | 66 cm | 69 cm | 69 cm | 69 cm |
| Length: | 68 cm | 81 cm | 81 cm | 85 cm |
| Seat height: | 62 cm | 56 cm | 62 cm | 62 cm |
| Seat width: | 43 cm | 46 cm | 46 cm | 46 cm |
| Wheel size: | 9"/23 cm | 12"/31 cm | 12"/31 cm | 14"/36 cm |
| Size folded H x L x W | L68xW28xH82 cm | L81xW28xH88 cm | L81xW28xH88 cm | L85xW28xH90 cm |
| Size folded without wheels H x L x W: | L61xW28xH74 cm | L67xW28xH76 cm | L67xW28xH76 cm | L67xW28xH76 cm |
| Weight: | 9,5 kg | 9,1 kg | 9,2 kg | 9,9 kg |
| Weight without wheels: | 6,6 kg | 6,4 kg | 6,5 kg | 6,6 kg |
| Max. user weight: | 150 kg | 150 kg | 150 kg | 150 kg |

Many rollator users set the grips too high, thinking that it will promote a more upright posture. But this actually worsens the posture, and it affects the stability negatively.
You can determine the correct grip height by doing as follows, as recommended by all physiotherapists and all rollator manufacturers:
1. To unfold the Walker, pull the two hand grips away from each other.
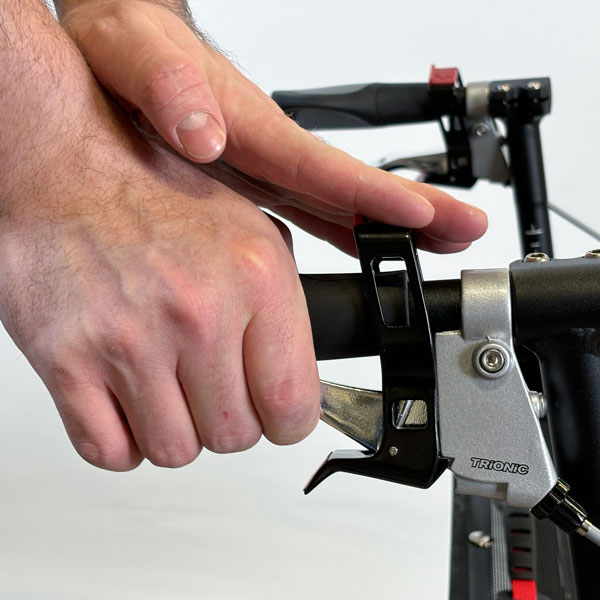
2. Grab the right grip with your right hand and lift the right front- and right rear wheel off the ground. With the right wheels lifted, lock the Walker in Walking mode by pressing the left rear corner of the seat distinctly downwards. You should hear a “click” when the Walker locks into walking mode.

3. Before using the walker, make sure that the unfolding mechanism has locked securely in place.
NOTE: It is important that you lift the right wheels off the ground, so that the right front wheel freely can turn into its aligned position.

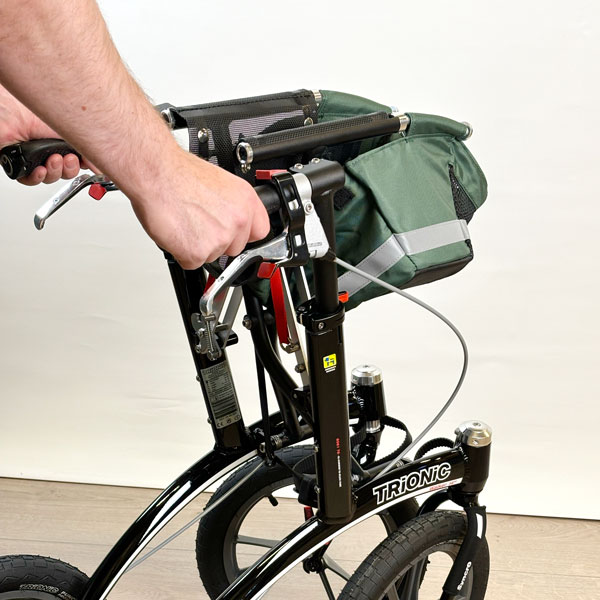
4. Open the quick-release levers and adjust the grip height as described on page 7 in the chapter “Grip Height Adjustment”.
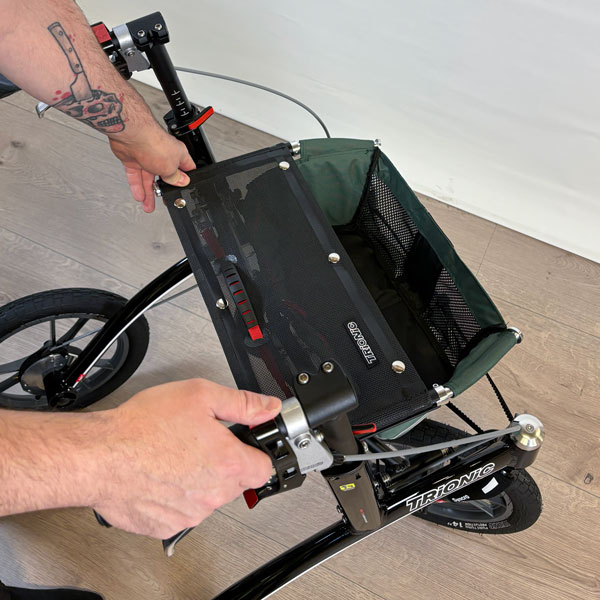
You can engage the parking brake in 3 different ways.
Option 1: Push the lower red parking trigger downwards with your index finger, while you pull the brake lever at the same time. Make sure that the parking brake is engaged, and that the Walker does not move.

Option 2: Pull the upper red parking trigger rearwards with your thumb, while you pull the brake lever at the same time. Make sure that the parking brake is engaged.
Option 3: Use both hands. Pull the upper red parking trigger rearwards with one hand, while you pull the brake lever with your other hand. Make sure that the parking brake is engaged.
To release the parking brake, brake in the same manner as for using the motion brake.
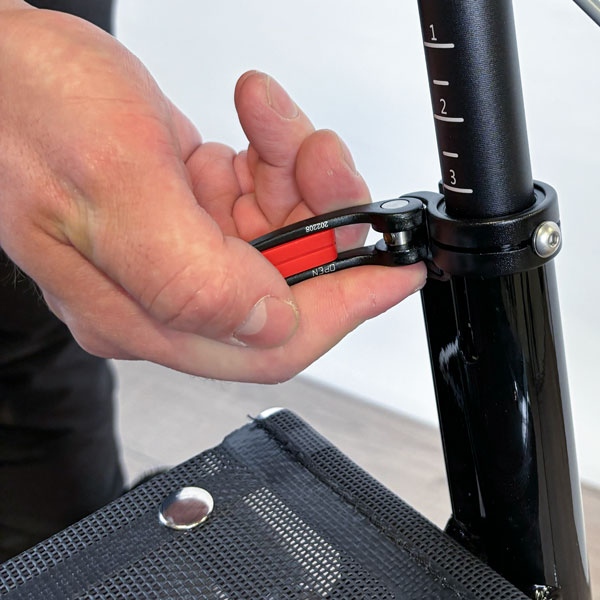
1. Release the quick-release lever positioned just above the seat by folding it outwards horizontally.
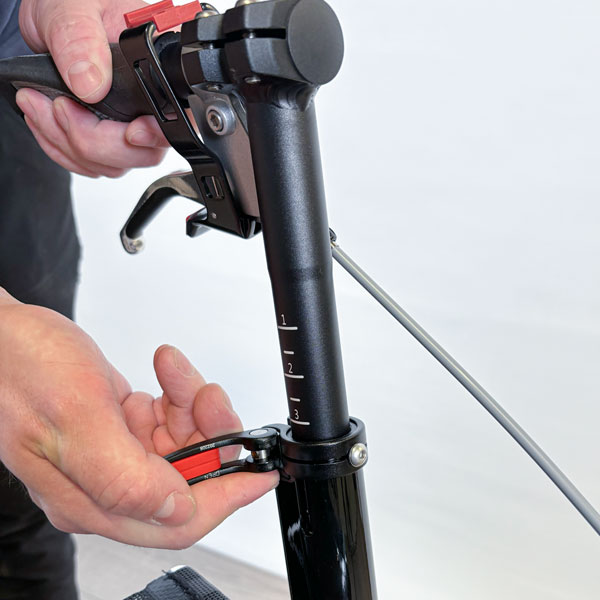
2. Slide the hand grip up-/downwards to your preferred grip height.

3. Lock the hand grip at the chosen height by folding the quick-release lever to its closed position.
NOTE: Do not operate the quick-release levers like wing nuts or screws.
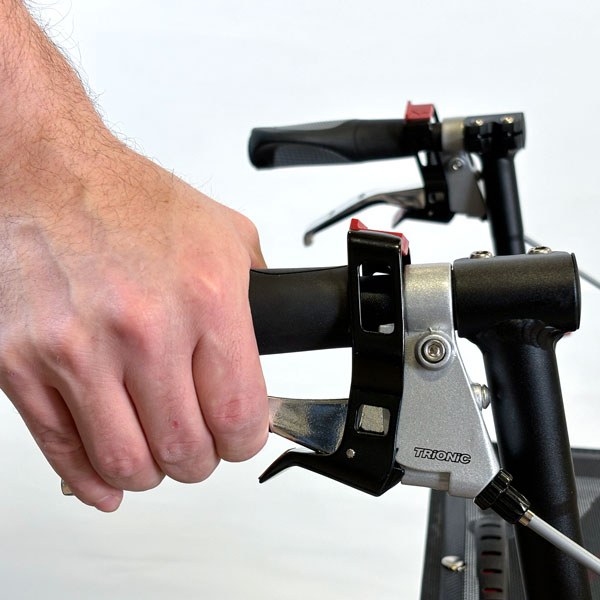
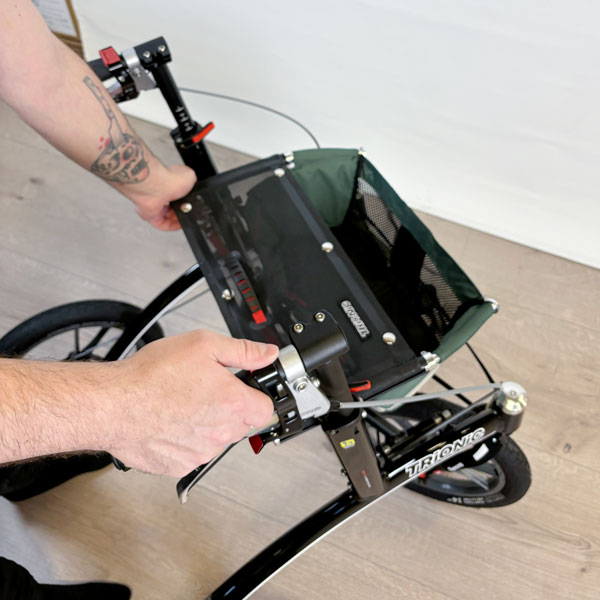
The angle of the grips can be adjusted so that you get a comfortable hand position and an optimal support.
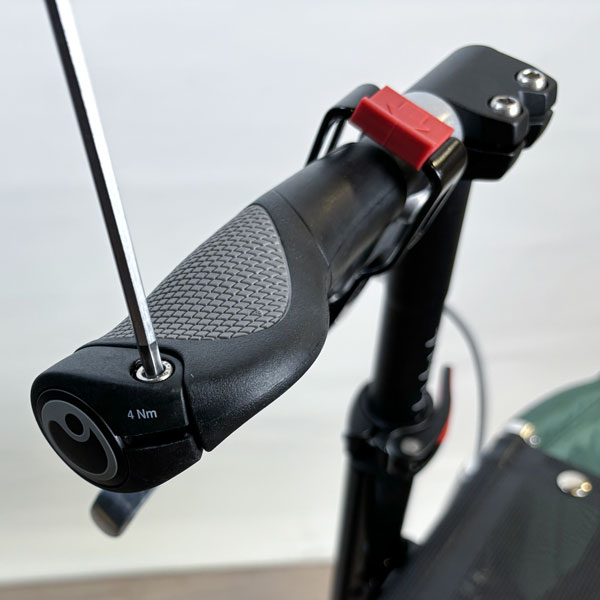
1. Loosen the screw on the rear end of the grip with a 4 mm Allen key.

2. Turn/rotate the grip to your chosen angle, and lock it in place by tightening the screw again.
1. To unfold the Walker, pull the two hand grips away from each other.
2.Grab the right grip with your right hand and lift the right front- and right rear wheel off the ground. With the right wheels lifted, lock the Walker in Walking mode by pressing the left rear corner of the seat distinctly downwards. You should hear a “click” when the Walker locks into walking mode.

3. Before using the Walker, make sure that the unfolding mechanism has locked securely in place.
NOTE: It is important that you lift the right wheels off the ground, so that the right front wheel freely can turn into its aligned position.
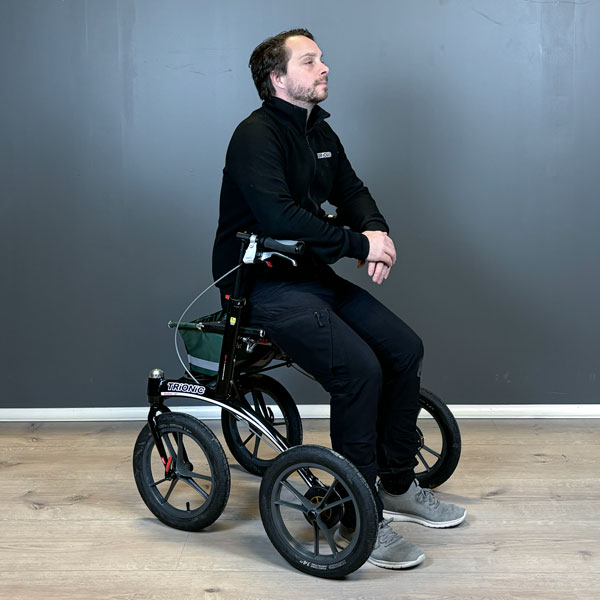
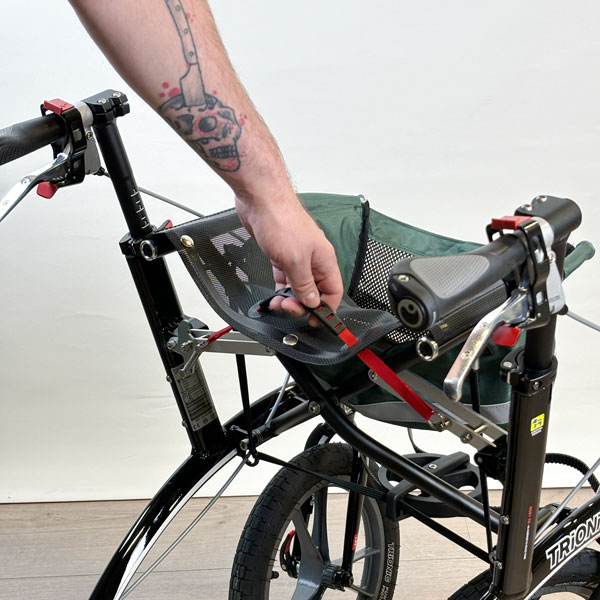
NOTE! Always engage both parking brakes before you use the seat.

1. Open the quick-release on the front wheel by folding it outwards.

2. Unscrew the nut on the inside of the fork a bit, so that the wheel can be detached from the fork.

3. Remove the front wheel from the fork.

4. NOTE: Do not operate the quick-release levers like wing nuts or screws.
1. Enter the front wheel into the fork, with the quick-release lever positioned on the outside of the Walker.
2. Tighten the nut on the inside of the fork, so that the quick-release gets correctly tensioned when closed.

3. Close the quick-release on the front wheel by folding it inwards. Make sure that the quick-release lever is correctly closed, preferably in a position behind the fork when seen in the traveling direction of the Walker.
4. NOTE: Do not operate the quick-release levers like wing nuts or screws.
The rear wheels are removable to simplify transportation of the Walker.
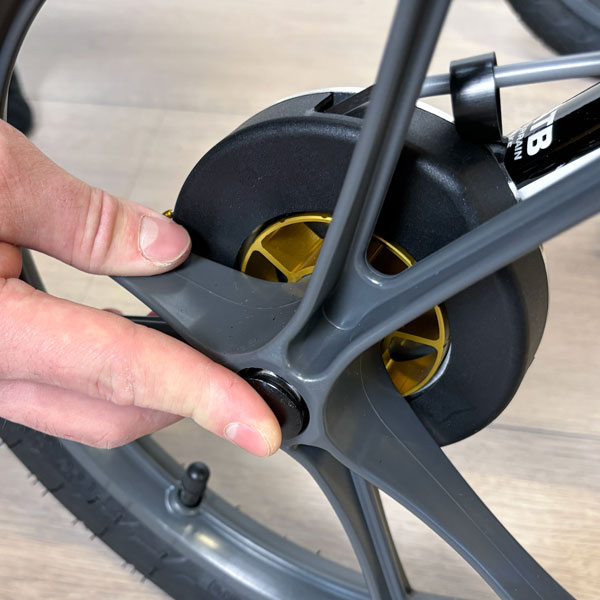
1. To detach the wheel, press the black button at the centre of the wheel and pull the wheel off.

2. To attach the wheel, press the black button at the centre of the wheel and push the wheel axle into the axle hole. Release the button when the axle is in its end position.
3. Hold the tire and push/pull the wheel back and forth laterally to check if the wheel is properly secured.

1. If the brakes works poorly, loosen the adjustment screw on each brake lever (counter-clockwise) and lock it in position by screwing the lock-nut towards the handle (clockwise).

Contact your retailer, or the person responsible for servicing your Trionic Walker, if the brakes still work poorly.
Before use, check that your Trionic Walker functions properly:
In order to maintain function and safety, make sure the following is carried out regularly:
Make sure to check the tyre pressure every 4–5 weeks. Trionic recommends a tyre pressure of 1.5 bar/22 psi.
Trionic does not take responsibility for any alterations (adjustments or inadequate repairs) done to the product without prior authorization.
 The Trionic Walker includes a 10-year guarantee, excluding parts that are subject to normal wear (tires, tubes, brake pads, brake cables, brake cable housings, grips and textile parts). The guarantee is valid from the date of purchase, and covers Trionic original parts only.
 CE – Trionic Sverige AB ensures that this Class I Medical Device meets the requirements of the EU regulation MDR 2017/745 and that it is certified to ISO 11199-2:2021.
The Veloped is tested and approved according to the international standard for rollators ISO 11199-2:2021 and it meets the requirements of the EU regulation for medical devices MDR 2017/745.
The user’s weight may not exceed 150 kg.

The Trionic Walker is manufactured in the way to have as little negative impact on the environment as possible during its lifecycle. When the product has served its purpose it can be scrapped and the parts can be recycled.

Trionic Sverige AB is a member of Repak Ltd Ireland and Valpak Limited in UK and fully implements the European Directive on Packaging and Packaging Waste dated December 20, 1994.
The neighbors all love it…
The Rollator arrived in perfect condition, all I had to do was take it out of the box and start using it. It meets all of my expectations, the neighbors all love it. John…
Mrs V Potts…
I purchased this for my husband, but he will not use it, don't know why as he hardly walks anywhere as he is not very steady on his feet. Having said that I keep thinking I will make use of it myself. At the moment I have only moved it a short way, b…
I would always choose it again...…
Dear Ladies and Gentlemen, I was made aware of your product (Veloped) by a friend.
I am 75 years old. I have Parkinson's disease and have been dependent on a rollator for several years… These rollators did not last long, so I was always looking fo…
Absolutely Marvelous…
My Trionic Trek helps me travel to places on-and-off sidewalks, roads, and trails. Even in deep snow. I am especially fond of knowing that I have the absolute freedom of walking alone ANYWHERE within a ten-mile radius of my home (during the long dayl…
Freedom at last.…
My wife had major back surgery and we had a fairly nice walker for her to use before and after the surgery. It is nothing compared to the Trionic we purchased. The engineering and craftsmanship are superb and obviously of high quality. It has given h…
Upsala…
I can finally walk upright with my new walker and do not have to look at the ground to avoid potholes and the like. My young grandchildren call to each other to be quick to catch up with Oma. At 84 years old I find it a bit heavy to get into my boot,…
A rollator for life…
A rollator for life. I found it for my daughter. It's called Walker 14 and it's impressive, big tires, not wheels!
The one that circumnavigates all cliffs, came to my mind immediately.
But it also has room for all that solidity and precise tinkerin…
It has made my world bigger!…
I'm a 62-year-old woman from the Netherlands and last year I suffered a CVA, which caused my right side to be permanently unusable. So since then, I have been stuck in a wheelchair.
During the last year, I went through therapy to try and recover …